Let's get the next block started!! This is by no means my design. I made this block when I joined a quilt-a-long from sewhappygeek. Go check out her blog and see all the fun stuff going on over there!! The block is the woven block. It goes together easily and quickly. Her block measurements are slightly bigger to make a 12.5" block - so I changed the measurements a bit to make it a 9.5" block. I have a link to her tutorial as well should any of my communication or pictures confuse you. As I say at the end of the post - I want this to be fun and I don't want confusion or frustration to keep you from liking this block. If you need a little more - her tutorial could help or leave me a message and I will do my best to follow up!!

Fabrics and Cutting Instructions:
Select 4 Colored Fabrics (I chose 2 greens, 1 yellow and 1 pink)
Select 1 Solid Fabric (I chose white)
Cutting the Colored Fabrics
From each colored fabric cut:
1 - 3" x 3" square
1 - 3" x 6" rectangle
WARNING: If you are using a directional print (see my green stripe) you want to watch how you cut so the lines or print match as you look up the block.
Cutting the Solid Fabric
From the solid fabric cut:
4 - 3" x 3" squares
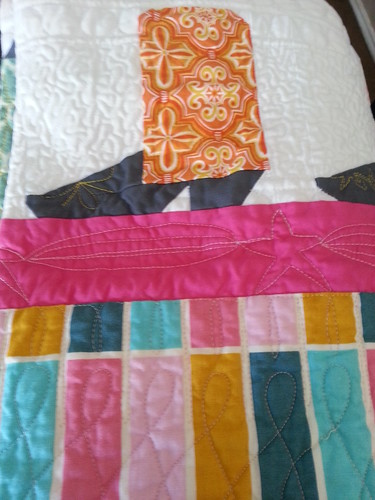
Lay the fabric out like the above photo. You want your solid square fabrics to be the outlying fabric on each side of the square.
Let's start sewing!!
Take one print fabric 3" x 3" square and sew to one solid fabric 3" by 3". CONFESSION TIME: I had to use my seam ripper because I did not watch closely where the solid and printed fabrics needed to be. Don't be me!! Double check how they will open after you sew them before choosing which side to sew on! Anyone else ever do that???

If you love to save thread - you can chain stitch all sets of the 3" x 3" squares.

After you sew all 4 square sets and press the seams - bring them back and reassemble the blocks to make sure everything is still looking good. Now just a couple things:
1. I use excess fabric at times because I want room to trim down and make sure the block looks great. For anyone of you who hate to waste even an inch of fabric may swoon a bit. I have just been too close to barely be able to cut up edges before.
2. So when you lay your fabrics down you will have a little extra on the long strip BUT don't panic!! We will clean it up in just a moment!

Let's attach the quadarants together now. See the picture above. You want to sew the quadarants with the solid white square at the bottom and the long strip on top of it. If you lift up the fabric like I have in the photo above and you see a printed square - flip it around or you will have to use your seam ripper!!

Now trim the excess off!

Now trim the excess off!

Press and come back to the table and lay out the four quadarants to make sure everything is assembled correctly. It should look like just above. Separate your 4 small blocks you just made down to two blocks on each side and sew. As an example: On the left side - I brought the yellow fabric block down on top of the pink and green. See the next photo to see how I laid my blocks on each other.

Now sew across the top. I would sew across my yellow fabric and on the second block across the green and yellow block.

For some reason blogger won't let me delete this photo - it is in here twice. Sorry!!
Press and bring back to the table. Now sew the two long panels together down the middle of the block and press. This is my block below face down with seams showing


Now bring the block over to the table and trim up your edges. I had a 10.5" block before I started trimming. So I took .5" (half an inch) off each side of the block to cut it down to 9.5".
And now you are done!! Great job! Thanks for stopping by my blog. Explaining in words how to do this is hard so let me know if you have questions and I will do my best to help. Also - sewhappygeek has a great tutorial so if there is a confusing spot - head over here to her tutorial. My feelings won't be hurt - I want you to have fun :).